This is our presentation on our pitch that we presented to the class. We did this presentation on Prezi.
Our Anamatic
This is our anamatic for our final task, it is a storyboard anamatic.
Different types of editing cuts
1|The cut
This is one of the most basic and common types of cuts in film. This is created when one shot is directly replaced by another shot. The cut has featured endless time in many films. The cut is important for the effects of juxtaposition.
This photograph shows the editing technique of cutting. You can see that each individual pictures is different, this is because they are different cuts. You can also see that each cut relates with the shot before. For our coursework, we are going to try use this technique, when someone two people are talking or if we use match on action, we can cut between shots.
2|Fade in/ Fade out
Fade in and fade out, is the second most important shot in terms of transition. Fading out is when a picture/shot slowly fades out to a black screen,. Fading out is mainly used in an ending of a film. Fading into a shot is the opposite of fading out of a shot. Rather than fading out of a shot, the fading in technique starts off as a black screen then it slowly fades into the shot. This is usually used in an ending of a scene of film. This is a very useful shot, and it should defiantly be used in our coursework, as a introductory shot or as an ending shot to the task.
3|Dissolve
This cut is very much like a fade in and fade out cut,except of fading into or out of a black shot it fades into or out of a shot, it gradually gets replaced by another shot. Once the shot has disappeared, the following shot appeared. The shot is also commonly known as an overlapping shot, because for a few seconds the two shots overlap and both can be seen for a few seconds when overlapping. If we were to use this in our course work, we would use it to show passing time.
This photo shows the overlapping between two different shots. This cut, could represent time passing.
4|Wipe
Wipes are old school shots, which aren't used as commonly now. It is a simple edit in which, one shot gets replaced by another shot by wiping across the screen. One shot gets pushed off the frame by another. This shot can be seen countless times through out the star war films.
Both these shots are from the star was films. There are different variations to this shot, It can swipe across diagonally, vertically or horizontally. These two shots wipe across diagonally.
5|Iris
This is an old fashion transition, which isn't so widely used in the present day. Iris is a framing, it is a circular frame that closes the picture to a black screen. Irises are usually found in children's films and cartoons. You can see from this picture, that it is a iris cut. The holding of the hands, with their backs facing us, walking away, makes us think that this is the ending to a film.
6|Continuity
This is shown in many films and dramas, this can be seen in the theme introductory of Eastenders. This happens when the audience don't notice the cuts made during a scene, the cuts look settle and unnoticeable.
7|Cut away
This is when you are focusing on a shot, then it cuts to another shot, then it cuts again to the original shot. This is usually used when someone is having conversation.
This is a perfect example of the cut away shot, from the famous film the God Father. It has three phases, the first picture, shows the original shot, it then cuts to a man in a white suit singing, then cuts back to the main subject.
8|Cross cut
This is when, you cut in two different locations. This is usually seen in a chase scene, a good example of chase scenes and cross cuts are from James Bond. The cross cut is a cut is usually used in intensive scenes.
This is a good example of cross cutting, this is a chase scene from James Bond Skyfall. You can see that the chase cuts between different locations.
Clip Examples of Editing
1|Cutting
Our Premlinary Task
This is our preliminary task, Harry and I are acting in the opening sequence of the film, whilst Charlie is filming. The opening sequence to a film is set near the bike shed at school. Our original plan was to do it at an abandoned hotel called Seaton Heights on the outskirts of Seaton in Devon. However this didn't go to plan, because as we started filming it was getting dark, so the short film starts with light condition, then progressively it gets darker and darker, which wouldn't make sense to the audience. As well we used poor lighting when filming in the dark. We decided that filming at school would be better, more accessible, and would have better lighting.
In the opening sequence, Harry is playing a hostage, tied up with a bag over his head. Harry was involved in online crime and I was a hitman who had to find out what he had done, apart from the fact that he was saying very little.
In our preliminary task we used match on action, used when we were opening the door. We used the 180 degree rule as well as an over the shoulder shot (this is the scene when I take the bag off of Harry's head) The first shot of me walking up the path to the bike shed is a tracking shot. When I walk through the gate its a mid shot of me through the checkered gate. Immediately after this shot Charlie on the camera does a whip pan which uses 2 different shots and combines them together.
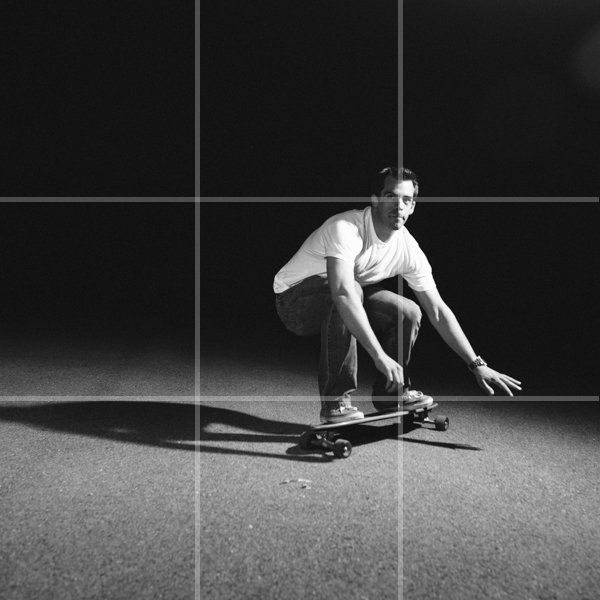
Rule Of Thirds
The rule of thirds is when a subject in the image is aligned with the guide lines, joining lines and points. This makes the viewer more attracted to the subject when it is aligned with the lines.
In this picture, the man on the longboard is particularly attracted by viewers as, his face is directly aligned on two lines joining together, as well his lower leg and foot are on a line. Both of his feet are on a line, which you can see him leaning back and turning the board. Types of Composition
Balancing Elements
This is when you have the main subject ( the building) off the centre as well as another image (the out sign) which applies with the rule of the thirds. The separation of the two subjects leaves an empty space in the middle. This makes the the image look more interesting. Its a simple yet interesting.
Leading Lines
Photos like this one here is particularly appealing to our eyes as our eyes are naturally drawn to leading lines. The leading lines like in this picture (the three white stripes) shows the lines leading to a man, this gives us an idea of perhaps a journey and sets a scene for the man. The are different varieties of lines they can be diagonal, zig zag, or curvy.
Symmetry and Patterns.
All around us there is patterns and symmetry, they can be natural and man made. They are usually appealing to our eyes. The Picture on the left shows patterns of a stoned walls stacked up. A monkey sits on the left hand corner with his leg stretched up on the wall, this picture could also be a rule of third image as the monkey is also appealing to our eyes as well as the symmetry and pattern of the picture. View Point
There are two types of viewpoint Photography- High and Low viewpoint Photography. The high shot viewpoint should be shot and have composition. This type of shot is not a eye level shot. The high level shot gives more of a feel to the place. For example the high level shot of the stair case, shows that the stair case could be in an old building as the stairs look quite 1940s. The low level shot, also gives a feel for a place. The red advertisement bill board from down bellow could be set in a sunny hot city, perhaps in the USA.
Depth
To do a depth shot we have to be careful and chose the right composition. The depth in this picture is the foothills and the clouds in the background. The first hill compared to the last hill, creates a sense of depth. As well, the picture shows overlapping hills, this developed and image in the human eye to have more depth.
Framing
All around there are objects that can create amazing natural frames, these objects can include of doors, windows, fences, caves, trees, holes and more. The human eye is drawn to whats in the middle of the frame.
Deconstruction of a poster
This is a film poster from The Grey, featuring Liam Neeson in 2012. : The shot in the poster is a close up, this shows his vulnerability because he is looking deep into the camera. The snowflakes around him suggests that he is in a bleak place. In addition, he is wearing a thick grey jacket, suggesting that he is in a cold place, the fact that the jacket is grey has a connection with the title 'Grey'. The gash on the left side of his face, suggests that his has perhaps been hurt or has been in an accident. The fact that he is the only person in the poster, suggests that maybe he is alone, or lonely, or trapped somewhere. The title 'The Grey' makes me think of fog, stormy weather, snow, wolves and mystery. The slogan underneath 'Live or die on this day' suggests that the film is an adventure and action film.
Here is a brief description/summary of the film from the IMDb film website:
In Alaska, a team of oil workers board a flight home; however, they cross a storm and the airplane crashes. Only seven workers survive in the wilderness and John Ottway, who is a huntsman that kills wolves to protect the workers, assumes leadership of the group. Shortly after they learn that they are surrounded by a pack of wolves and Ottway advises that they should seek protection in the woods. But while they walk through the heavy snow, they are chased and attacked by the carnivorous mammals.
Camera Terminology
1|Aerial shot
Otherwise known as a Birds Eye view, the aerial shot is when the camera shot is viewed from directly above. It is often used to establish an exotic place of establish the feel of a place.
2|Arc Shot
This shot is used when a subject is stationary, but the camera moves around the subject in a semi circle.
3|Close ups
(Medium Close up From Harry Porter)
There are variations of close ups, which include:
Big close ups- A very personal shot as its very much focused on their face and eyes. Facial expressions become apparent as well as increasing tensions.
Close ups- This is usually used in a romantic genre as it shows facial expressions.
Medium Close up- The picture to the left of the page, is a medium close up, Nothing apparent is happening in the background as it all focused on his facial expressions and eyes, showing tension and perhaps fear.
4| Establishing shot
(Establishing Shot from the Lord of the Rings)
Usually quite a wide/ lengthy shot, often used at the start of a film of program. When switching scenes, an establishing shot is usually part of the next scene in a program
5| High Angle shot
High shots are usually shot in horror films or action films, as it shows when a character is most vulnerable, powerless or isolated. Usually the crane technique is used to get this shot.
6| Low Angle shot
This shot is the opposite of a high angle shot, instead of vulnerability it gives the impression of being big and powerful and confidence. It makes the audience feel small and weak
7| 180 Degree Shot
The 180 degree rule is when two characters in a scene maintain a right and left relationship with each other, this is often used when both characters are having a conversation with one another. When the camera pass the invisible line/axis, it is called crossing the line and becomes a shot called the revers shot.
This is our 180 degree shot, its a sequence from our first practical work.


 You can see from this picture, that it is a iris cut. The holding of the hands, with their backs facing us, walking away, makes us think that this is the ending to a film.